Boeing Stearman Model 75 Duster and Sprayer Просмотр ZIP-архива
450 Stearman Duster Update for FS2004/ReadMe.txt
Changes and Tips Version 2

This upgrade for the Stearman ag-planes started about two months after the first release in late 2005, and still isn’t finished, with two models yet to come for FS9 and FSX. It began as a patch for the bugs with the first package, and snowballed into a complete overhaul. We bought the factory drawings for the Model 75, and Douglas spent the last year and a half reworking the models from the ground up. There are some new animations, and everything is more pleasing to the eye.

Aside from the new airframe, the engine and prop are also entirely new items. The parts are less complex, and are a more accurate representation of the real thing. The old cylinders were ridiculously inaccurate - they looked like they belonged on a Lycoming radial, not a P&W.

Flight dynamics have been reworked; and we abandoned the technique we used to make the ground handling less stable on the original airplanes. It certainly gave your feet something to do, but it caused other, less desirable characteristics. There are many compromises that must be made in order to best serve realism, and I believe we have the list down to only the aforementioned item. That’s not to say that you can take a nap on the landing roll, but it will take longer before it heads for the weeds.

The biggest difference in ground handling is the tendency to nose over during hard braking. Set the FS9 brakes repeat slider to the halfway position before you fly, and keep the stick back in your lap when you get on the binders. The elevators are slightly effective even with the engine idling, so keep that stick aft when you touch the brakes. If it does go over, the engine will stop and it will remain in a tail high position. Hit “Y” to enter slew mode, then come out of slew and you’ll be back on the gear ready to restart the engine and try it again.

You’ll be okay for the run-up; hold the stick back, then go ahead and cycle the prop and do the mag check, but don’t go over 30” M.P. - especially with the prop in high pitch.

Tail wheel steering is improved, and it’s easier to swing the tail around too. As before, you can open the throttle to increase the steering effect. Tap the brake on the inside wheel for a really tight turn, then use a little throttle with full rudder deflection to blow the tail around.

On takeoff, the tail can be raised almost immediately, and it will come up on it’s own much sooner than with the original planes. With the Version 2 airplanes, you can fast taxi with the tail up at 35-40 mph with complete control. Take care that you don’t raise the tail too high, if you strike the prop you’ll kill the engine.

As before, you should reduce power to M.E.T.O as soon as possible after takeoff, and put the prop in high pitch.  One more time on that – PUT THE PROP IN HIGH PITCH – if you don’t, you’re costing yourself performance - about 8 mph in cruise alone. M.E.T.O power for the R-985 installation in the Stearman is 30”/1850 for 300 hp. That’s a restriction imposed by the FAA, not Pratt & Whitney. In MSFS, you can certainly exceed that, and use the manufacturers recommended Max Continuous or Normal Rated power, but be advised that if you try to fly around using more than takeoff power, the engine will be damaged and it will fail. It’ll take a little longer now, but it’ll still bite you.

When they qualified a test engine for the takeoff power rating, P&W ran it for 10 hours (equivalent to over 1000 takeoffs) without failure at that power output. That’s a new engine in a test cell under strictly controlled conditions, not one that’s in-service under a wide range of adverse variables. With the virtual engine on the 450 Stearman, you can fly at the takeoff power rating until the fuel tank is dry, and the engine will operate normally. That’s true of Version 1 and Version 2 airplanes. But, when using power outputs in excess of that rating, and especially in excess of 40” M.P. you must use care and operate it that way for a short time only, or you will damage the engine.

Once in the air you’ll find it handles a bit better, especially in pitch. It’s much easier to pull out of a steep dive and level off a few feet from the ground now, the tendency to over-control has been reduced. That change was made in the airfile, and if you have a big elevator axis null zone on your stick you might want to reset it to default with this airplane.

Some people have reported they had trouble doing a good aileron roll with it. Much like the real airplane, you need about 120 mph on the clock as you start the maneuver, then raise the nose to about the normal climb attitude before you drop the wing. Use full aileron deflection, take care to limit the amount of top rudder you use, and mind the forward stick as you go inverted. With a little practice a very nice looking roll can be accomplished, but you have to pay attention to where the nose is pointing and take care of that as you go around.

Stalls and spins are unchanged; use a normal entry and recovery. A hard forward slip will need more forward stick than before to keep the airspeed needle where it belongs. Mind you don’t get too slow on a slip to a landing…

A few folks have had trouble landing the Stearman, and the only cure for that is more practice. It’s a high drag airplane, and needs to be very close to the ground before you start raising the nose. While learning, you should carry some power on approach. As you break the glide and round out, slowly pull the power off in the flare.

Some find that it’s easier to wheel it on; you could do it that way until you’re familiar with it, and then go for the three-point stuff. With a little practice a full stall three point landing is certainly possible - even with a dead stick – if you learn to control the airspeed and descent rate properly.

We’ve added an exhaust flame effect to the exterior visual model and virtual cockpit. It responds to the mixture control; if you’re operating below about 1500 feet MSL pulling the red knob back until the flame turns blue will put you at approximately best power.

About the Scenery

To start a flight from the scenery, on the FS2004 “Go To Airport” menu enter “65JC” in the “Airport ID” box. That will bring you to “Jack’s Airstrip”. You can also use the included flights to go to the airstrip installed with the scenery. From the FS2004 “Select a Flight” menu, scroll down to “Stearman Duster Version 2” and choose a flight from there.


Have fun and enjoy it!


Installation:

This is a stand-alone update. If you have the older version installed (Stearman Model 75 Duster and Sprayer) it will not be affected except for the scenery. The scenery will be updated to a much-improved version. No other changes to the original installation will result.

Unzip the installer to a temporary location and run it. It will place all files into your FS2004 directory at the following location: “C:\Program Files\Microsoft Games\Flight Simulator 9”. If your FS2004 installation is elsewhere, or if you’re one of those suspicious types who (wisely) doesn’t trust auto-installer programs, then use the browse feature to direct the installation to your FS2004 location, or in the case of the distrustful individual, to a temp folder where you can vet all the files for normalcy.

To remove the software from your FS2004 installation:

Look in these locations –

C:\Program Files\Microsoft Games\Flight Simulator 9\Addon Scenery\scenery

Delete the following bgl files found there:

1. AF2_65JC.bgl
2. jacksbeacon.BGL
3. Jack's Airstrip.bgl
4. jacks hangar.bgl
5. jackswindsock.BGL


C:\Program Files\Microsoft Games\Flight Simulator 9\Addon Scenery\texture

Delete the following bitmap files found there:

1. calendar
2. drums
3. fence
4. hangar
5. jacks
6. metal
7. paper
8. photo
9. print
10. st75
11. tv
12. window


C:\Program Files\Microsoft Games\Flight Simulator 9\Aircraft

Delete the following folders found there:

1. Stearman 75 450 hp 1955_Vers2
2. Stearman 75 450 hp 1955_Vers2_nde


C:\Program Files\Microsoft Games\Flight Simulator 9\Effects

Delete the following .FX files found there:

1. fx_dusterv22.fx
2. fx_dusterv2.fx
3. fx_engstrt_stearman75v2.fx
4. fx_vclightmodel75v2.fx


C:\Program Files\Microsoft Games\Flight Simulator 9\Flights

Delete the following folder found there:

1. Stearman Duster Version 2


C:\Program Files\Microsoft Games\Flight Simulator 9\Gauges

Delete the following cabinet file found there:

1. st75_55.cab


C:\Program Files\Microsoft Games\Flight Simulator 9\Sound

Delete the following .ini (1) and .wav files (5) found there:

1. st75_450.ini
2. st75_carb_heat
3. st75_park
4. st75_primer
5. st75_rotor_brake
6. st75_switch

That completes the removal of all files.


Enabling Cockpit Sounds

The aircraft are wired to use Doug Dawson’s excellent “dsd_xml_sound3.gau”.

The “dsd_xml_sound3”.gauge is *NOT* included in this package. You’ll need to download it from one of the Flight Simulator websites. Once you have it installed in FS2004, you need to do the following to enable it with the new Stearman dusters:

Browse to the panel.cfg files in each of the Stearman folders, the path to each of those is:

1. C:\Program Files\Microsoft Games\Flight Simulator 9\Aircraft\Stearman 75 450 hp 1955_Vers2\panel

2. C:\Program Files\Microsoft Games\Flight Simulator 9\Aircraft\Stearman 75 450 hp 1955_Vers2_nde\panel

Open each panel.cfg file with Notepad, find the [Vcockpit02] section shown below, and remove the slashes from in front of “gauge23” for “Stearman 75 450 hp 1955_Vers2”, and “gauge22” for the model without the ag-equipment, “Stearman 75 450 hp 1955_Vers2_nde:


[Vcockpit02]
Background_color=0,0,0
size_mm=1024,1024
visible=1
pixel_size=1024,1024
texture=$Stearman VC2

gauge00=St75_55!vsi,  438,620,404,404
gauge01=St75_55!compass2,  7,215,404,404
gauge02=St75_55!b7,  6,620,404,404
gauge03=St75_55!75 clock,  230,9,200,200
gauge04=St75_55!fuel valve control2,  500,4,150,120
gauge05=St75_55!mags,  934,14,87,85
gauge06=St75_55!prop,  503,162,46,44
gauge07=St75_55!trim regulator,  441,107,46,44
gauge08=St75_55!throttle,  441,52,46,44
gauge09=St75_55!mixture,  441,0,46,44
gauge10=St75_55!hopper,  561,151,53,44
gauge11=St75_55!kohlsman knob,  503,128,45,27
gauge12=St75_55!75 clock knob,  559,128,57,27
gauge13=St75_55!mp,  661,  0 ,214,214
gauge14=St75_55!panel lights2,  904,170,100,147
gauge15=St75_55!nav,  887,810,100,147
gauge16=St75_55!generator,  887,355,100,147
gauge17=St75_55!battery switch,  887,581,100,147
gauge18=St75_55!8755,  1000,119,15,15
gauge19=St75_55!8759,  858,1004,10,10
gauge20=St75_55!8760,  858,989,10,10
gauge21=St75_55!8761,  858,974,10,10
gauge22=St75_55!8762,  858,944,10,10
//gauge23=dsd_xml_sound3!dsd_xml_sound3,  858,959,10,10,.\Sound\st75_450.ini


When you start it will look like this:

//gauge23=dsd_xml_sound3!dsd_xml_sound3,  858,959,10,10,.\Sound\st75_450.ini

When you finish it should look like this:

gauge23=dsd_xml_sound3!dsd_xml_sound3,  858,959,10,10,.\Sound\st75_450.ini


For “Stearman 75 450 hp 1955_Vers2_nde” it looks like this to start:

//gauge22=dsd_xml_sound3!dsd_xml_sound3,  858,959,10,10,.\Sound\st75_450.ini

And this when you’re done:

gauge22=dsd_xml_sound3!dsd_xml_sound3,  858,959,10,10,.\Sound\st75_450.ini


Save the changes and you’re all set. You’ll now have sounds for the following:

1. All toggle switches
2. The engine primer
3. Carburetor heat control
4. Parking brake handle

A final word about cockpit controls and sounds: someone wrote and “corrected” the aircraft.cfg file for us. This person had noticed the presence of this section:

[flaps.0]
type             = 1
span-outboard    = 0
extending-time   = 0.8
flaps-position.0 = 0
flaps-position.1 = 100
lift_scalar = 0.0
drag_scalar = 0.0
pitch_scalar= 0.0
system_type = 3

and very kindly pointed out that we were wrong to include it, because the Stearman doesn’t have flaps, much less flaps that extend beyond the vertical position. We also neglected (he further counseled) to set the lift, drag, and pitch scalars for our mythical flaps, so even if the Stearman did have such flaps installed, they wouldn’t be doing us much good.

He then went on to say that the fuel shutoff valve had stopped working in the VC, and no movement or sound was evident, and could we please offer a fix. Well, that valve depends on the stock flaps animation in order for it to move, which explains the presence of that strange section in aircraft.cfg, so please leave it in place. There’s also a flaps reference in the sound.cfg file, and you might want to leave that alone too.


A final word:

There is no support offered or implied with this free software. If you’re having trouble with something, consult the documentation located at “C:\Program Files\Microsoft Games\Flight Simulator 9\Aircraft\Stearman 75 450 hp 1955_Vers2\documentation”, or the "Stearman_75_ref" and "Stearman_75_check" available on the FS2004 kneeboard. For anything not covered in those, or in this document - you’re on your own.


Douglas Kallen and Robert Sanderson

Touch the Sky Simulations 2007


[email protected]
39429-Stearman-Duster.zip
| Имя файла | Дата | Размер |
|---|---|---|
| 450 Stearman Duster Update for FS2004/ | 15.07.2011 04:38 | |
| 450 Stearman Duster Update for FS2004/450 Stearman for FS2004.exe | 06.10.2007 11:59 | 16 MB |
| 450 Stearman Duster Update for FS2004/Copyright.txt | 06.10.2007 12:12 | 864 B |
| 450 Stearman Duster Update for FS2004/Description.txt | 06.10.2007 12:20 | 588 B |
| 450 Stearman Duster Update for FS2004/ReadMe.txt | 06.10.2007 11:25 | 13 KB |
| st75/ | 15.07.2011 04:37 | |
| st75/copyright.txt | 15.12.2005 19:46 | 774 B |
| st75/description.txt | 16.12.2005 21:50 | 615 B |
| st75/ReadMe.doc | 16.12.2005 17:02 | 32 KB |
| st75/ReadMe.txt | 16.12.2005 19:57 | 5 KB |
| st75/st75.exe | 16.12.2005 19:23 | 30 MB |
| avsim_su.diz | 15.07.2011 07:37 | 406 B |
| Итого: | 46 MB | |
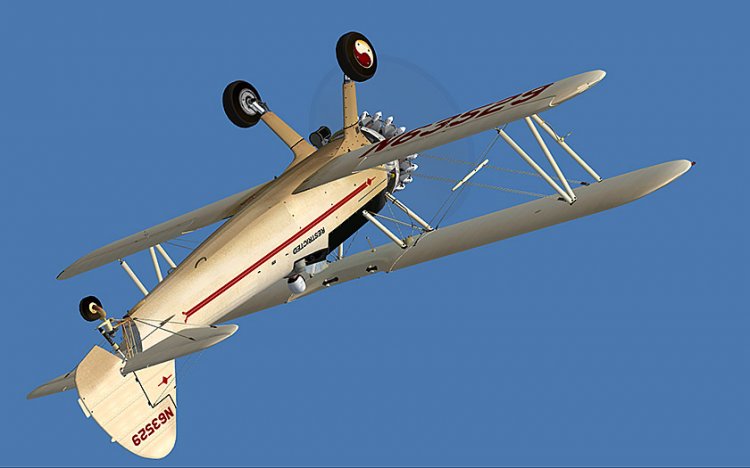
A four-airplane package that represents a 10-year history of one ag-plane from 1955 to 1965. Features four highly detailed models with fully animated parts, detailed and animated pilot figure, visual effects, complex virtual cockpit with clickable controls, custom gauges, and engine damage modeling. Each model has accurate flight dynamics, with realistic stalls, high drag slips, and spins with autorotation. This package includes as scenery an ag-operations hangar, and dirt airstrip. Also included in this download are two all-new more accurate aircraft models with additional features and animations. The original scenery is also patched and improved. This update is a stand-alone installation that will not affect the original aircraft. Only the scenery from the original will be modified. See ReadMe for more information.
→ Size:
45 MB
→ Date:
15 years ago (15.07.2011 03:48)
→ Author:
Robert Sanderson, Douglas Kallen
→ Approved by moderator:
SLAVJAN
→ License:
License file included in archive
→ Downloaded:
2333 time(s)