Douglas DC-3 Просмотр ZIP-архива
README_DC3_MAAM_PANEL.txt
FS2004/FS2002 Douglas DC-3 MAAM-SIM Panel Modifications
=======================================================

These are not official modifications, but they are uploaded with MAAM-SIM's permission. MAAM-SIM is the volunteer flight simulation development wing of the Mid-Atlantic Air Museum at KRDG Reading, PA.

Designed initially for pilots at 'DC-3 Airways' (www.dc3airways.com) who seek alternative panel options, these are modifications of the panel supplied in the MAAM-SIM package for the DC-3, configured in two versions.

The First Officer panel has been removed, and in both versions everything is consolidated on, or is accessible from, the Pilot's panel.  Most features are accessible from the VC also.

The first of these versions replaces the Sperry autopilot with a Bendix autopilot and adds an HSI and an RMI to the panel; the second retains the Sperry but replaces the DG with a more modern gyro with Heading bug.  This panel also has an RMI but a conventional VOR1 gauge. Both panels have a number of other enhancements including standby radios.

They are nothing revolutionary, but they are the panels with which I like to fly the MAAM-SIM DC-3 aircraft myself and so I hope that you may like them too.  Please note that this package does not pretend to be an 'improvement' or 'fix' of any kind to the MAAM-SIM DC-3 panel, which is exceptional and is a highly accurate representation of the cockpit in MAAM's R4D-6; it is, rather, simply a set of modifications offering options that are a little more generic and user-friendly for the DC-3 in today's skies. Particular attention has been paid to the requirements of online flying, both in multiplayer and in a controlled environment.

These panels are NOT for use with the MAAM-SIM R4D-6 and, as presented here, will not function with the default Microsoft DC-3.  They are specifically for use with the MAAM-SIM DC-3 models, and this download requires a previous installation of the wonderful FS2004/FS2002 aircraft package available at www.maam.org.

'DC-3 Airways' pilots should note that DCA liveries are available from Avsim.com, Flightsim.com and Simviation.com: look for DCAMAAMP.ZIP (three passenger liveries), DCAMAAMF.ZIP (two cargo liveries) and DCAMAAM3.ZIP (optional lower resolution textures for all the above).

This README presumes some familiarity with the software add-ons described below, given that most who install this package are likely to be familiar with my previous 'IFR' panel for the default DC-3 aircraft and with the operation of Roger Wilco or Teamspeak communications software.  However, these panels are standalone and can be installed whether or not you intend to make use of the facilities for online communications.  No doubt keen pilots will make their own, further, private modifications to what I supply here.  Feel free!

By Mark Beaumont
.
File name: DCAMAAM4.ZIP

_______________________________________________


FEATURES:

Many features will be familiar to any user of my 'IFR' panel modification for the default FS2004 aircraft.


COMMON TO BOTH PANELS INCLUDED IN THIS PACKAGE:

1. Engine control unit on main panel moved up slightly to clearly show trim wheel markings.

2. Bendix Radio Stack offering standby radios and ADF with decimal point function. The default MAAM radios have been removed from the overhead, although the original audio panel remains.

3. Default GPS replaced by the Garmin 530 by Don Kuhn and now linked as a pop-up from the pilot's position. Note that this needs to be turned on (second knob down) when first opened.

4. ATC Control Panel - Bill Morad's excellent panel, which I have visually modified slightly to fit, sits neatly under the compass as a pop-up and enables control of all FS ATC functions using the mouse, rather than having to use the keyboard.

5. Roger Wilco Switch panel - allows selection of up to nine preset (configurable) Roger Wilco frequencies from the cockpit. Toggled as a pop-up, appearing under the compass (in the same place as the ATC Control Panel, but the latter does not function in multiplayer so there is no conflict of positioning; you will never need to use both simultaneously).

6. Gear indicator lights (locked, unlocked) placed centrally on the main panel.

7. A timer by Ike H Slack in a pop-up window for flight or pattern leg timing, together with a digital wind speed and direction readout.

8. Aircraft registration, as set in the sim by the user as "ATC name", will appear on the panel under the Attitude Indicator in 2D, IFR and VC views and, just for fun, on the "Operations Manual" in the Speeds Placard pop-up.

9. Flight map, gear/flaps, cowl flaps and de-ice gauges icons now provided on the pilot's side.

10. Expanded mini-panel ('W' key) now shows the key six instruments, respective to each version.

11. Radio CD player by R.L. Clark - an indulgence, but for those of you who enjoy long flights, this is a wonderful add-on.  The original README is included.  You can play CDs from within the sim and select up to 12 presets (MP3s, WAV files or MIDI files) from your computer's hard drive.

12. ServInfo gauge can be toggled from an icon on the lower part of the panel in 2D and IFR views.

13. Fuel Quantity gauge now on pilot's panel.

14. Door warning light now on pilot's panel.

15. FSTSTuner status light on any instance of the Bendix COM2 radio (just above readout).

16. Change of instrument nightlighting to a reddish glow typical of many DC-3s.  Most early instruments were not actually backlit but were lit by small red bulbs shining down on them.  This is the best I could do for now.

17. Almost all simicons are now on a pop-up panel on the left side.  This enables the panels to be flown 'clean', and also adds the benefit of making all pop-ups accessible from the VC, albeit that inevitably they cannot form 'part' of the VC but appear as 2D images.

18. Most changed gauges carry through to the IFR pop-up and VC.


BENDIX AP PANEL:

1.  NAV/GPS switch.

2.  HSI and RMI fitted.

3.  Bendix Autopilot on main panel.  Radios replicated, slightly larger, on Overhead and in VC (with audio).

3.  Timers icon opens timer and also Fuel Flow gauge and Windspeed/Direction readout.


SPERRY PANEL:

1.  Bendix radios on Overhead panel. No Bendix autopilot as Sperry remains installed.

2.  New DG with Heading bug, and RMI fitted.

2.  Separate dual DME on main panel.  Also in IFR mode and VC.


_______________________________________________


INSTALLATION:

Please read this carefully, or print this section out for reference as you install. If installing to FS2002 rather than FS2004, for all references to "Flight Simulator 9", below, read "FS2002".

1.  You must have installed the base DC-3 package from Mid-Atlantic Air Museum Simulations (www.maam.org). Please read all instructions carefully, as the configuration information for the base installation is not repeated here.  It is presumed that 'DC-3 Airways' pilots will have added the company liveries listed above; general users may have downloaded other repaints.  All can use these panels.

2.  Download and unzip DCAMAAM4.ZIP to a temporary folder on your hard drive.

3.  Within it, look for and move the folder 'MAAM-SIM DC-3 IFR' inside the AIRCRAFT folder to ..../Flight Simulator 9/AIRCRAFT/.  This will create a new aircraft sub-folder 'MAAM-SIM DC-3 IFR' (this is necessary, as for the standby radios to function, changes have to be made to the AIRCRAFT.CFG file of the original as you will read below.  If you try to use this new panel in the unedited, original installation, it will work, but you will have no standby radios which rather negates the point of installing it!  Furthermore, if you try to modify the AIRCRAFT.CFG of the original to enable these standby radios, then the original MAAM-SIM radios will not work at all.  So don't!)

4.  Under ..../Flight Simulator 9/AIRCRAFT/ find the MAAM-SIM-installed folder 'MAAM-SIM DC-3 Passenger'.  From this folder, COPY all contents to your new 'MAAM-SIM DC-3 IFR' folder EXCEPT the PANEL folder. You may choose not to copy all the TEXTURE folders across if you will not want to use all of them with this panel modification.  Just copy across those folders that you need, and modify the new AIRCRAFT.CFG accordingly - see below.

PLEASE NOTE:  you can copy any of your cargo TEXTURE folders into the same folder 'MAAM-SIM DC-3 IFR' if you wish to fly them with this panel.  The airfiles are the same for both passenger and cargo models. If you do so, you will need to copy the 'model.bea' folder across from the folder 'MAAM-SIM DC-3 Cargo' as well as the relevant cargo model TEXTURE folders.

5.  Within your new 'MAAM-SIM DC-3 IFR' folder, you will find two panel folders, namely PANEL and PANEL.SPERRY.

Go to your 'MAAM-SIM DC-3 Passenger' folder and open the PANEL folder within.  Copy all files within this PANEL folder to BOTH of the panel folders within 'MAAM-SIM DC-3 IFR', except for:

DC3_FO.BMP
DC3_FO_IFR.BMP
DC3_Pilot.BMP
PANEL.CFG

Do this carefully, If you get any prompts to overwrite, you're copying the wrong files.  To repeat, make sure you copy all the relevant panel bitmaps into BOTH your new PANEL and PANEL.SPERRY folders.

6.  Now look for the AIRCRAFT.CFG file within 'MAAM-SIM DC-3 IFR' and open it with a text editor.

Make sure that you have [flightsim.xx] entries corresponding to any texture sets you copied across.  Delete any unnecessary ones and add any that are not there.  To save effort, you can copy whichever passenger and cargo entries you need from their original AIRCRAFT.CFG files.

Then under each [flightsim.xxx] entry add:

'IFR' to the end of the title=xxxxx line in each case (otherwise your new aircaft will not show up in the selection menu; it needs to be differentiated from the original) e.g.title=Douglas DC-3A UAL IFR

'IFR' to the end of the ui_variation=xxxxx line (so that, in the FS selection menu, you can distinguish between aircraft with or without these modified panels) e.g. ui_variation=United NC 16063 IFR

By default, all aircraft will access the Bendix AP panel version. For every aircraft with which you wish to use the Sperry panel option, edit the panel= line to read as follows: panel=sperry.  It's up to you whether you wish to further edit the ui_variation= line for such aircraft e.g. ui_variation=United NC 16063 IFR (Sperry)

Make sure all your new [flightsim.xxx] entries are numbered sequentially.

Still within this new AIRCRAFT.CFG file, carefully change the [RADIOS] section as follows:

[Radios]
// Radio Type=availiable, standby frequency, has glide slope
Audio.1=1
Com.1=1, 1
Com.2=1, 1
Nav.1=1, 1, 1
Nav.2=1, 1, 1
Adf.1=1
Transponder.1=1
Marker.1=1

That's all. Save the file.

7.  Move the contents of the GAUGES folder to ..../Flight Simulator 9/GAUGES/ .  Do not open any CAB files within the supplied GAUGES folder, just move everything across.  Those who have previously installed my modifications for the default aircraft will have many of these gauges already.  Overwrite if prompted, as one or two have been further modified.  Previous installations will not be affected. EXCEPTION: if you have previously installed my RW switch gauge and configured the RWSWITCH.INI file, do NOT transfer this new RWSWITCH.INI file, as it is unconfigured.  Just delete it.

8.  Lastly, move the file in the SOUND folder to ..../Flight Simulator 9/SOUND/.  You will probably also have this file already.


______________________________________________


OPERATION OF THE PANEL ITSELF:

Hopefully, operation of these panels is reasonably straightforward to anyone who has already used the MAAM DC-3 panel.  Some comments:

1.  By default, on opening either of these panels the icon stack will be visible on your left.  The pop-ups available are self-explanatory.  You can toggle this icon panel at any time by clicking on the icon by the clock, which is backlit at night.  It is also available from the VC.

2.  The OVERHEAD icon opens access to the radio equipment in both versions (although the radios are on the main panel anyway on the Bendix AP version. Radios and audio are also accessible from the VC.

3.  For VATSIM and IVAO fliers, the ServInfo gauge in the 2D and IFR panel views will open a ServInfo panel.  ServInfo needs to be installed and running in the background for this gauge to be of any use, of course.

4.  The Speeds Placard, which used to be on the FO side (now non-existent) can now be toggled by clicking on the bottom right of the main panel. NOTE: When you open the 'Speeds Placard', accessible bottom right on the main panel, the 'manual' cover that pops up is entitled 'DC-3 Airways Operations Manual'.  If you wish to replace this file with one reading 'Douglas DC-3 Operations Manual', look in your 'MAAM-SIM DC-3 IFR' folder for the folder 'ALT 'SPEEDS' BITMAP'.  Inside is a file called 'speeds.bmp'.  Copy it into both panel folders (PANEL and PANEL.SPERRY) and overwrite the originals.

5.  To see MAP and RPM gauges when the GPS is deployed, open the full ECU pop-up first. You will see the tops of these gauges above the other windows.  Note that all windows can be moved about onscreen once opened if you wish to reposition them.

6.  ATC commands can be executed from the pop-up panel, using a mouse rather than the keyboard.

7.  All else should work as intended by MAAM-SIM themselves e.g. cowl flap and gear/flaps pop-ups, kneeboard etc. 'DC-3 Airways' pilots: please note that my DC3_KNEE.ZIP kneeboard modification for DCA works just fine with these panels.


_________________________________


OPERATION OF THE COMMS ADDITIONS:

This section is only relevant to anyone wishing to use the RW switching or FSTSTuner gauge.


FEATURES:

1. 'FSTSTuner' gauge

'Teamspeak' (not included here) can be used for radio communications between pilots flying together online.

'FSTSTuner' (not included here) is additional software which enables selection of 'Teamspeak' communications channels from your cockpit within FS2004, by selection of appropriate frequencies on your COM2 radio.

The light (actually a gauge) that this installation configures on your Bendix COM2 radio will respond to changes of frequency and will indicate the status of your connection at any time.

Frequencies can be changed both in the 2D and 3D cockpits. The 'FSFSTuner' README file is included in this download for your convenience.

2.  'Roger Wilco' VHF radio

'Roger Wilco' is alternative software for radio communications between pilots flying together online.

Enabling switching of up to nine preprogrammed communications channels in 'Roger Wilco', this radio has nine selection keys, one CLEAR key and a digital readout of the selected VHF channel.  There is a choice of orange or white readout.

The keys need to be preset by the user to list any required IP addresses for 'Roger Wilco' channels.


REQUIRED SOFTWARE:


1.  For 'Roger Wilco", download the software from rogerwilco.gamespy.com. Some people have reported bugs with the latest version in multiplayer; this gauge has been tested on Version Mk1.d3 1.4.1.6 dated July 2 2003, which is therefore recommended as it works just fine, and is available from various flight simulation sites. Follow the configuration instructions.

2.  If you wish to use 'Teamspeak', download, and install 'Teamspeak' Client from www.teamspeak.org.  Configure channels according to your own requirements or that of your VA.

3.  If using 'Teamspeak', download and install 'FSTSTuner' at www.innergears.com/FS2004/FSTSTuner/FSTSTuner.zip (further information is to be found at www.innergears.com/fs2004/FS2004.aspx).  Read instructions carefully and configure 'FSTSTuner' in accordance with your settings in 'Teamspeak'.

4.  'FSTSTuner' supplies the necessary gauge, 'InnerGears.gau' (the parent gauge for 'TSTuner.gau') which should go to your main FS2004 gauges directory.  The 'FSTSTuner' folder itself MUST be installed in your root 'Flight Simulator 9' folder.


CONFIGURATION OF THE RW SWITCH PANEL:

1.  After installation of this package, open the main FS2004 GAUGES folder.  Locate and open the file 'rwswitch.ini' using any text editor.  Carefully edit the line that indicates the location of your 'Roger Wilco' installation on your hard drive.  By default, I have entered this as c:\program files\roger wilco\roger.exe.

2.  Next, list any required IP addresses for 'Roger Wilco' next to the number entries.  A typical entry might read:

4=212.47.22.25

Once done (you don't need to configure all nine), save the 'rwswitch.ini' file.  Note that you can edit/update this file at any time.

NOTE: By default, the gauge is configured for an orange readout to match the Bendix radios supplied with Mark Beaumont's IFR panel.  If you are using the gauge in another panel and would prefer a white readout, find the gauge in your PANEL.CFG and rename it as follows:

from

gauge00=rwswitch!orange,  0,0,135

to

gauge00=rwswitch!white,  0,0,135


COMMS OPERATION:

To use the 'Roger Wilco' VHF radio, select it with the relevant icon in the icon stack.  It will appear just below the compass.  'Roger Wilco' must be running in the background for the gauge to function. Otherwise, operation is quite straightforward.  Click on any number on the panel to select whichever frequency you configured for that number.  If you have left blank entries, do not select such numbers; the error message you provoke will cause a task switch.

Note that the VHF appears in the same place as the ATC switching gauge used in this panel (the bitmap used in the gauge is designed to be similar - thanks, Bill Morad) and whichever you open first will take priority.  However, you should never need to use both together.  If you are, close one to see the other.

Similarly, to use the 'FSTSTuner' gauge, 'Teamspeak' must be running in the background.  It is not necessary to start the 'FSTSTuner' software itself, which is used only for initial configuration.

If after installing the 'FSTSTuner' gauge in your panel(s) you find that the frequency does not change promptly when you dial in a new one on your COM2 radio, you will find that if you hover your mouse over the new annunciator light (don't click on it) it will do so.

Please read 'Roger Wilco', 'Teamspeak' and 'FSTSTuner' documentation thoroughly should you experience any problems with the orientation or operation of this equipment before e-mailing me with questions!  Thank you.

IMPORTANT NOTE:  You don't need to install both Comms systems ('Roger Wilco' and 'Teamspeak') on your system to install these panels.  Although configured for both, it will only recognise what you are using.

NOTE FOR USERS OF TSCOMSET:  This alternative method of selecting 'Teamspeak' frequencies using COM1 (my own preference) has been tested successfully with these panels.  It requires no special configuration, but does of course have to be running in the background.

__________________________________________


CREDITS:

Credits and licences are included in the 'docs' folder within the 'MAAM-SIM DC-3 IFR' folder, but these are some of those who have helped me make these modifications to MAAM's already wonderful panel:

-The team at MAAM-SIM.  Without the base panel that Bill, Jan, Fred, Rob, Bill and Howard put together, we'd have no starting point.  Keep up the great work, men!  I modified Bill's panel bitmap slightly only to accommodate the raised quadrant and used a gauge bitmap to construct one of my own in the same style, but otherwise this is mostly the team's work.
-Scott Thomas and Nick Pike for permission to include and rework their HSI and RMI gauges.  Check out their contribution to the fantastic Howard 500 created with Milton Shupe and Joбo Paz, which you can read about at  www.flightsimonline.com.  A must for all fans of the radial engine!
-Matt Kaprocki, a good friend, for his excellent work in programming the 'Roger Wilco' switch gauge.
-Bill Morad (R.I.P.) for his very useful ATC switch gauge
-Ike Slack for his Coyote Avionics Design timer gauge
-Roman from the Avsim forums for his new windspeed gauge XML code and gauge idea which I modified
-Robert Guy for his wonderful Fuel Status gauge
-Dirk Fassbender for his unique map gauge, used in the Speeds Placard pop-up
-R.L. Clark for his very clever Radio/CD player
-Jorge Salas for his camaraderie and his excellent CPT.ICONS gauge which I modified for this project
-Don Kuhn for the Garmin 530 GPS
-Anybody whose gauges might have slipped in here that I have not recognised and should thank. Please let me know if I have goofed and I will replace any disputed inclusions.
-All the pilots at DC-3 Airways (www.dc3airways.com) who kindly responded with their ideas on what they would like to see in a modified panel.  This little effort won't please all, but may please some, so thank you!
-The team at Microsoft for a fantastic simulation on which to base all this.

_______________________________________________


LEGAL BIT:

These panel modifications, although by no means 'official', were made WITH THE EXPRESS PERMISSION OF MAAM-SIM and may not be further modified or uploaded for public distribution of any kind without similar permission from the original authors.  If you have any queries about this, then write to [email protected].  Do not write to me as I have no authority to grant permission for further work.  As stated clearly in the MAAM-SIM manual, the only modifications that may be made to the MAAM-SIM product without specific permission being granted are texture repaints.

__________________________________________


These modifications work for me and others but, should you have installation issues, please feel free to be in touch AFTER you have checked that you have followed the above instructions correctly.  That said, if you've read this far, hopefully you won't be one who has to write!

That said, I take no responsibility for what you may do, or think you may have done, to your own system by installing these freeware files.


Copyright July 2004

Mark "Dark Moment" Beaumont
VP Fleet
DC-3 Airways

www.dc3airways.com

[email protected]
http://www.swiremariners.com/dc3.html
dcamaam4.zip
| Имя файла | Дата | Размер |
|---|---|---|
| Aircraft/MAAM-SIM DC-3 IFR/ | 10.07.2004 00:52 | |
| Aircraft/MAAM-SIM DC-3 IFR/alt 'speeds' bitmap/ | 10.07.2004 00:34 | |
| Aircraft/MAAM-SIM DC-3 IFR/alt 'speeds' bitmap/speeds.bmp | 09.07.2004 14:55 | 616 KB |
| Aircraft/MAAM-SIM DC-3 IFR/docs/ | 10.07.2004 01:04 | |
| Aircraft/MAAM-SIM DC-3 IFR/docs/ATC-Panel/ | 07.07.2004 15:09 | |
| Aircraft/MAAM-SIM DC-3 IFR/docs/ATC-Panel/Bitmap/ | 07.07.2004 15:09 | |
| Aircraft/MAAM-SIM DC-3 IFR/docs/ATC-Panel/Bitmap/atc-win orig.bmp | 23.05.2002 15:10 | 77 KB |
| Aircraft/MAAM-SIM DC-3 IFR/docs/ATC-Panel/Cut&Paste/ | 07.07.2004 15:09 | |
| Aircraft/MAAM-SIM DC-3 IFR/docs/ATC-Panel/Cut&Paste/Gauge Information.txt | 27.05.2002 11:17 | 49 B |
| Aircraft/MAAM-SIM DC-3 IFR/docs/ATC-Panel/Cut&Paste/Windows Information.txt | 24.05.2002 21:50 | 702 B |
| Aircraft/MAAM-SIM DC-3 IFR/docs/ATC-Panel/Cut&Paste/Windows Title.txt | 24.05.2002 21:49 | 18 B |
| Aircraft/MAAM-SIM DC-3 IFR/docs/ATC-Panel/Readme.htm | 28.05.2002 21:16 | 92 KB |
| Aircraft/MAAM-SIM DC-3 IFR/docs/ATC-Panel/Readme_files/ | 07.07.2004 15:09 | |
| Aircraft/MAAM-SIM DC-3 IFR/docs/ATC-Panel/Readme_files/filelist.xml | 28.05.2002 21:16 | 577 B |
| Aircraft/MAAM-SIM DC-3 IFR/docs/ATC-Panel/Readme_files/header.htm | 28.05.2002 21:16 | 2 KB |
| Aircraft/MAAM-SIM DC-3 IFR/docs/ATC-Panel/Readme_files/image001.png | 28.05.2002 21:16 | 5 KB |
| Aircraft/MAAM-SIM DC-3 IFR/docs/ATC-Panel/Readme_files/image002.jpg | 28.05.2002 21:16 | 6 KB |
| Aircraft/MAAM-SIM DC-3 IFR/docs/ATC-Panel/Readme_files/image003.png | 28.05.2002 21:16 | 613 B |
| Aircraft/MAAM-SIM DC-3 IFR/docs/ATC-Panel/Readme_files/image004.jpg | 28.05.2002 21:16 | 780 B |
| Aircraft/MAAM-SIM DC-3 IFR/docs/ATC-Panel/Readme_files/image005.png | 28.05.2002 21:16 | 13 KB |
| Aircraft/MAAM-SIM DC-3 IFR/docs/ATC-Panel/Readme_files/image006.jpg | 28.05.2002 21:16 | 20 KB |
| Aircraft/MAAM-SIM DC-3 IFR/docs/ATC-Panel/Readme_files/image007.png | 28.05.2002 21:16 | 598 B |
| Aircraft/MAAM-SIM DC-3 IFR/docs/ATC-Panel/Readme_files/image008.jpg | 28.05.2002 21:16 | 2 KB |
| Aircraft/MAAM-SIM DC-3 IFR/docs/ATC-Panel/Readme_files/image009.png | 28.05.2002 21:16 | 147 KB |
| Aircraft/MAAM-SIM DC-3 IFR/docs/ATC-Panel/Readme_files/image010.jpg | 28.05.2002 21:16 | 36 KB |
| Aircraft/MAAM-SIM DC-3 IFR/docs/ATC-Panel/Readme_files/image011.png | 28.05.2002 21:16 | 325 B |
| Aircraft/MAAM-SIM DC-3 IFR/docs/ATC-Panel/Readme_files/image012.jpg | 28.05.2002 21:16 | 838 B |
| Aircraft/MAAM-SIM DC-3 IFR/docs/ATC-Panel/Readme_files/oledata.mso | 28.05.2002 21:16 | 135 KB |
| Aircraft/MAAM-SIM DC-3 IFR/docs/cad_legal.txt | 27.01.2003 16:19 | 819 B |
| Aircraft/MAAM-SIM DC-3 IFR/docs/fuelstatus_readme.txt | 28.10.2002 21:03 | 7 KB |
| Aircraft/MAAM-SIM DC-3 IFR/docs/Garmin 530/ | 07.07.2004 15:09 | |
| Aircraft/MAAM-SIM DC-3 IFR/docs/Garmin 530/530 430 desc.txt | 17.10.2003 08:57 | 4 KB |
| Aircraft/MAAM-SIM DC-3 IFR/docs/Garmin 530/530 Default Nav Page.doc | 09.11.2003 18:34 | 98 KB |
| Aircraft/MAAM-SIM DC-3 IFR/docs/Garmin 530/530 Nav Bar Page.doc | 17.10.2003 12:39 | 90 KB |
| Aircraft/MAAM-SIM DC-3 IFR/docs/Garmin 530/GNS530 default nav page.jpg | 17.10.2003 09:41 | 69 KB |
| Aircraft/MAAM-SIM DC-3 IFR/docs/Garmin 530/GNS530 default nav terr.jpg | 05.11.2003 06:42 | 67 KB |
| Aircraft/MAAM-SIM DC-3 IFR/docs/Garmin 530/GNS530 map page.jpg | 17.10.2003 09:46 | 59 KB |
| Aircraft/MAAM-SIM DC-3 IFR/docs/Garmin 530/GNS530 nav bar.jpg | 17.10.2003 09:44 | 70 KB |
| Aircraft/MAAM-SIM DC-3 IFR/docs/Garmin 530/Intro and Directions.txt | 09.11.2003 18:32 | 3 KB |
| Aircraft/MAAM-SIM DC-3 IFR/docs/nightview.jpg | 07.07.2004 01:46 | 122 KB |
| Aircraft/MAAM-SIM DC-3 IFR/docs/openview.jpg | 07.07.2004 01:46 | 202 KB |
| Aircraft/MAAM-SIM DC-3 IFR/docs/popupview.jpg | 10.07.2004 01:04 | 219 KB |
| Aircraft/MAAM-SIM DC-3 IFR/docs/Radio CD Player/ | 07.07.2004 15:09 | |
| Aircraft/MAAM-SIM DC-3 IFR/docs/Radio CD Player/2002panel.cfg | 15.11.2003 13:00 | 5 KB |
| Aircraft/MAAM-SIM DC-3 IFR/docs/Radio CD Player/2004panel.cfg | 15.11.2003 13:00 | 5 KB |
| Aircraft/MAAM-SIM DC-3 IFR/docs/Radio CD Player/md5.exe | 17.11.2003 20:38 | 248 KB |
| Aircraft/MAAM-SIM DC-3 IFR/docs/Radio CD Player/radiocd4.gif | 15.11.2003 13:00 | 6 KB |
| Aircraft/MAAM-SIM DC-3 IFR/docs/Radio CD Player/readme1st.txt | 15.11.2003 13:00 | 6 KB |
| Aircraft/MAAM-SIM DC-3 IFR/docs/Radio CD Player/userguide.gif | 15.11.2003 13:00 | 27 KB |
| Aircraft/MAAM-SIM DC-3 IFR/docs/vcview.jpg | 07.07.2004 01:45 | 134 KB |
| Aircraft/MAAM-SIM DC-3 IFR/panel/ | 10.07.2004 00:32 | |
| Aircraft/MAAM-SIM DC-3 IFR/panel/atc-win.bmp | 17.01.2004 02:22 | 77 KB |
| Aircraft/MAAM-SIM DC-3 IFR/panel/DC3_PILOT.bmp | 01.07.2004 14:46 | 769 KB |
| Aircraft/MAAM-SIM DC-3 IFR/panel/deice.bmp | 09.07.2004 17:53 | 114 KB |
| Aircraft/MAAM-SIM DC-3 IFR/panel/Panel.cfg | 10.07.2004 01:23 | 14 KB |
| Aircraft/MAAM-SIM DC-3 IFR/panel/Sims.bmp | 09.07.2004 19:14 | 100 KB |
| Aircraft/MAAM-SIM DC-3 IFR/panel/speeds.bmp | 06.07.2004 17:21 | 616 KB |
| Aircraft/MAAM-SIM DC-3 IFR/panel.sperry/ | 10.07.2004 00:32 | |
| Aircraft/MAAM-SIM DC-3 IFR/panel.sperry/atc-win.bmp | 17.01.2004 02:22 | 77 KB |
| Aircraft/MAAM-SIM DC-3 IFR/panel.sperry/DC3_PILOT.bmp | 01.07.2004 14:46 | 769 KB |
| Aircraft/MAAM-SIM DC-3 IFR/panel.sperry/deice.bmp | 09.07.2004 17:53 | 114 KB |
| Aircraft/MAAM-SIM DC-3 IFR/panel.sperry/Panel.cfg | 10.07.2004 01:23 | 13 KB |
| Aircraft/MAAM-SIM DC-3 IFR/panel.sperry/Sims.bmp | 09.07.2004 19:14 | 100 KB |
| Aircraft/MAAM-SIM DC-3 IFR/panel.sperry/speeds.bmp | 06.07.2004 17:21 | 616 KB |
| Aircraft/MAAM-SIM DC-3 IFR/README_DC3_MAAM_PANEL.txt | 10.07.2004 00:58 | 22 KB |
| Aircraft/ | 22.06.2004 03:52 | |
| Gauges/as532_map.gau | 11.10.2002 16:05 | 168 KB |
| Gauges/ATC-WHM.gau | 28.05.2002 20:06 | 64 KB |
| Gauges/cad_fs2k2dcagauges.gau | 17.05.2003 11:31 | 80 KB |
| Gauges/cpt.DC3A.icons.CAB | 09.07.2004 19:29 | 11 KB |
| Gauges/DC3_HSI_RMI.cab | 29.06.2004 18:59 | 61 KB |
| Gauges/DC3_reg.CAB | 08.07.2004 04:07 | 820 B |
| Gauges/FS9Garmin530_R1.cab | 08.11.2003 03:45 | 188 KB |
| Gauges/Propliner.Gyro.gau | 05.02.2000 00:04 | 238 KB |
| Gauges/radiocd4.gau | 15.11.2003 13:00 | 368 KB |
| Gauges/RKG_fuelstat.gau | 29.05.2004 22:24 | 578 KB |
| Gauges/rwswitch.gau | 01.04.2004 20:45 | 56 KB |
| Gauges/rwswitch.ini | 07.07.2004 14:42 | 115 B |
| Gauges/servinfo.gau | 15.12.2003 04:15 | 683 KB |
| Gauges/Windspeed.CAB | 07.07.2004 17:16 | 359 B |
| Gauges/ | 08.07.2004 04:10 | |
| Sound/click.wav | 26.01.2002 21:18 | 3 KB |
| Sound/ | 22.06.2004 03:52 | |
| README_DC3_MAAM_PANEL.txt | 10.07.2004 00:58 | 22 KB |
| dc3maam.gif | 07.07.2004 15:22 | 15 KB |
| avsim_ru.diz | 09.02.2003 03:00 | 394 B |
| Итого: | 8 MB | |
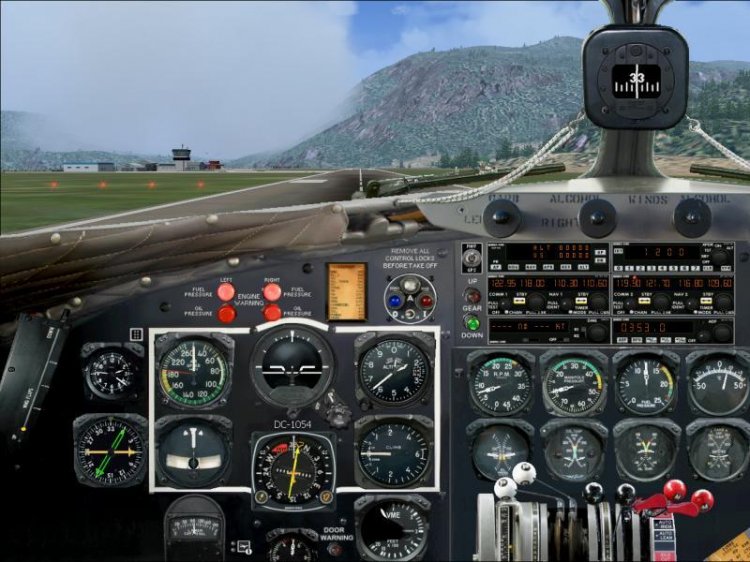
The panel for the plane Douglas DC-3, excellent quality.
→ Size:
3 MB
→ Date:
22 years ago (10.07.2004 14:17)
→ Author:
Mark Beaumont
→ License:
Freeware - Free version, Unlimited Distribution
→ Downloaded:
1611 time(s)